Myself and my friends have been playing a Pathfinder campaign as a distraction from all the Covid stuff for the last year. To give our regular DM a break and a chance to play himself, I’ve been running some side adventures at appropriate times in the main campaign.
To try and have something different from the undead heavy I went hunting for something with some classic dungeon creatures – namely Mimics and Rust Monsters. I couldn’t find an existing adventure that fit my needs and reading other people’s adventures gave me the itch to try my hand at my own.
Given it’s been a long time since I wrote anything like this (probably 25+ years!), it’s possibly a little uneven on the challenge rating of the encounters but most should be adjustable up and down with the addition/removal of a similar creature. We did this with a group of six 5th level characters.
The maps were created using Inkarnate. There are links at the bottom to a zip containing versions usable in Roll20 as well as to editable versions on Inkarnate.
All feedback on it is welcome and I’d love to hear from anyone that actually runs it.
Background
An Intellect devourer has set up a lab in an abandoned crystal mine to try and create a Rust Dragon to help defeat his rival who has gone down the road of clockworks to build an army.
To this end, he has trapped four Rust Monsters and is force feeding three of them metals and channelling energy from them into the fourth to force a transformation into a Rust Dragon. The fourth is in a metal chrysalis and is near maturation. This is only the latest in a line of failed experiments but each attempt is bringing him closer to success.
To feed the Rust Monsters, he has tasked a band of low grade mercenaries to raid ore caravans. As the experiments have increased in pace, so has the need for ore and thus an increase in raids.
The local authorities (be it a lord, mayor or a group of annoyed mine owners) are sick of the raids so hire the party to put an end to them.
In parallel, his rival has caught wind of the plan and sent a squad of his Clockwork Soldiers to put a stop to the experiment. They slaughtered the bandits and made their way to 2.7 The Hatchery and did some damage to the chrysalis but were stopped from destroying it.
The party will coincidentally arrive at the camp within hours of this happening.
In general, there is little treasure until the end – anything with significant amounts of metal tends to end up in the hatchery and non-metallic magic items made their way to the intellect devourer’s horde.
Intro
Bandits have been raiding caravans over the last few months. After the last raid, we caught a break and one of our rangers was able to track them back to their base of operations at the head of an abandoned mine. He was unfortunately spotted and wounded while escaping. Deal with them however you want and you’ll be rewarded with XYZ.
- Can the ranger come
- No, injured and recovering.
- What’s the make up of the bandits?
- About 10, humans, nothing notable about them. Standard looking gear.
- What have they been targeting?
- Tending to go for ore shipments from the local mines.
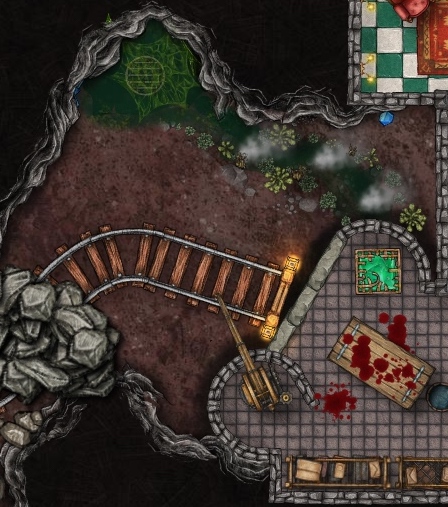
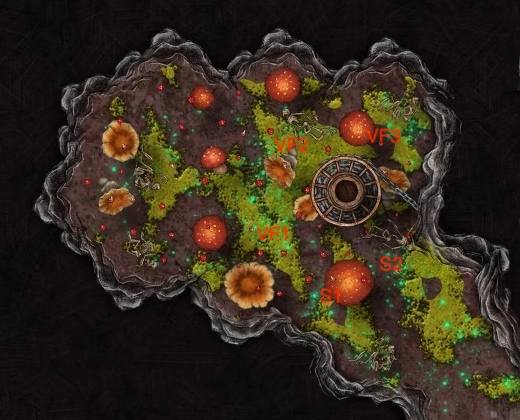
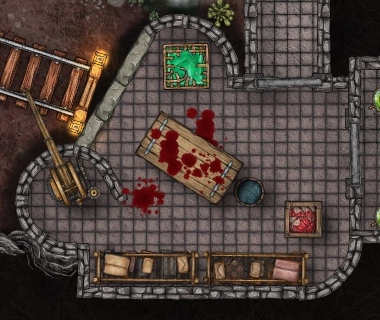
1. The Camp
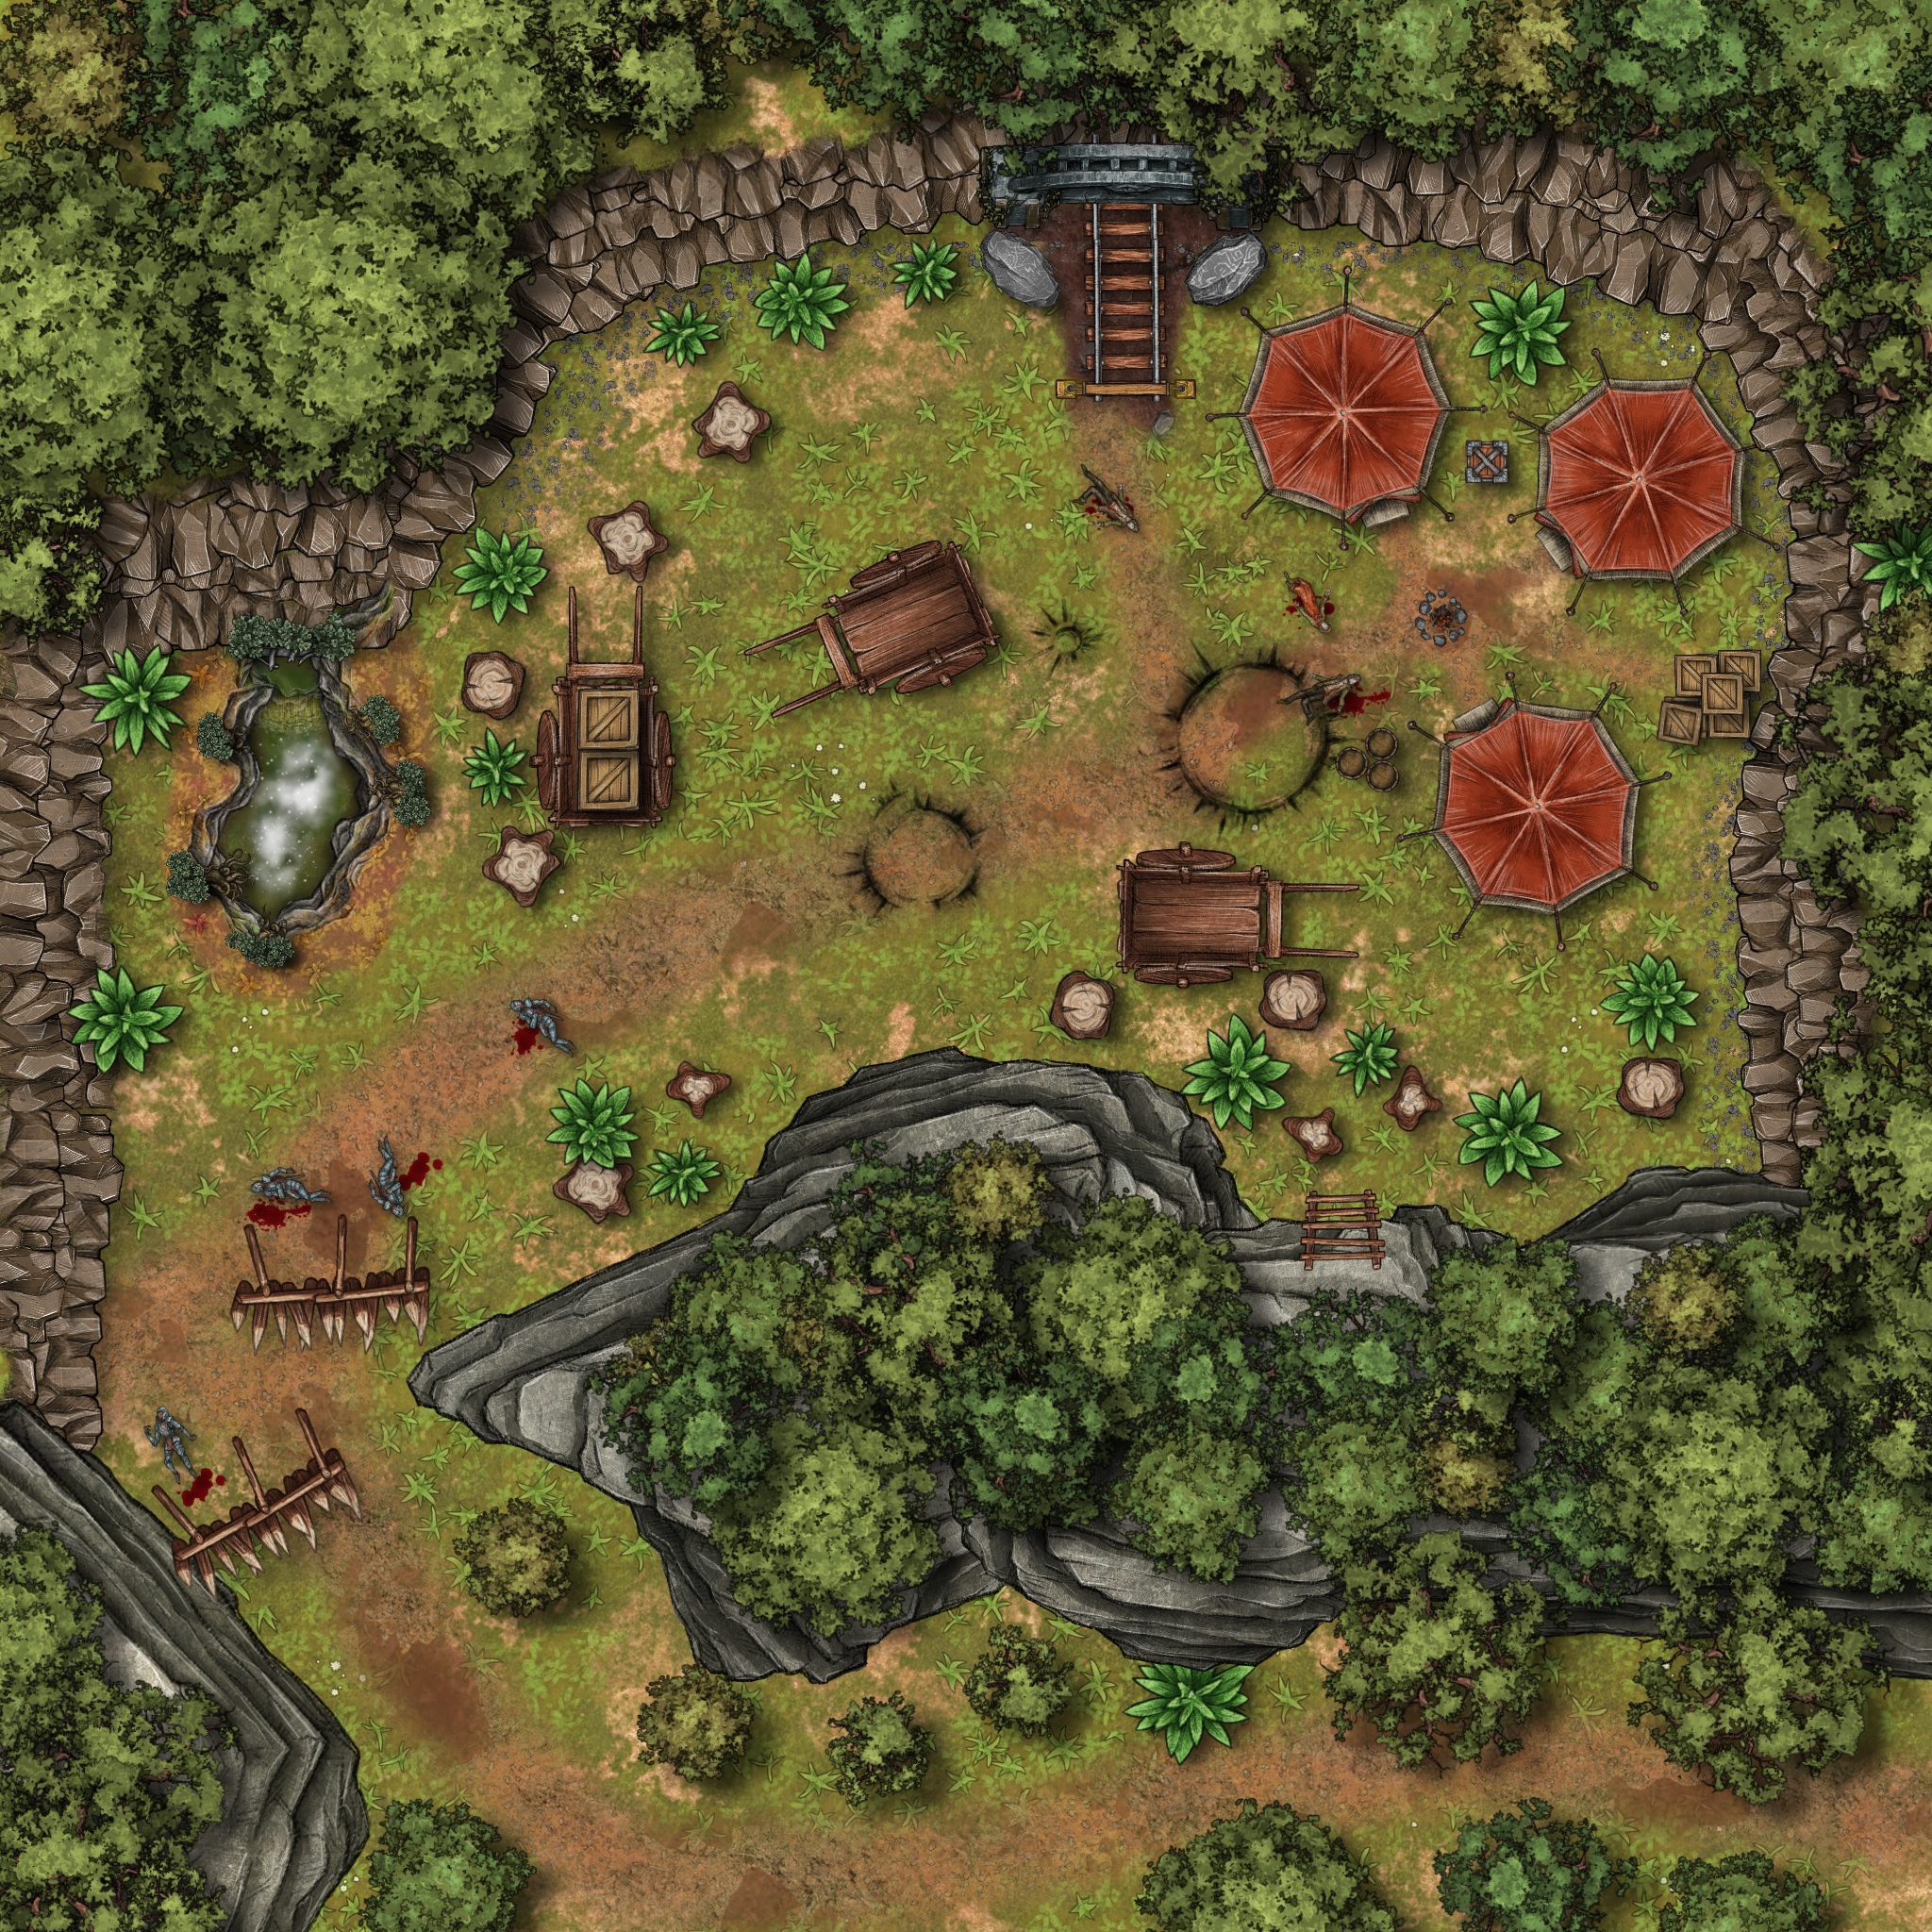
As the party approaches the camp, the party sees evidence of a recent skirmish. On entering the camp, they see the bodies of slaughtered bandits.
Past the barricades, the bandit camp sits in a hollow surrounded on 3 sides by cliffs. To the north of the camp is a filthy pool with steam slowing rolling off it. To the east is a cluster of tents around a smoking fire pit.
If the party tries to find clues (e.g through tracking), they notice that the foot prints of the attackers are deeper than you’d expect.
1.1 The pool
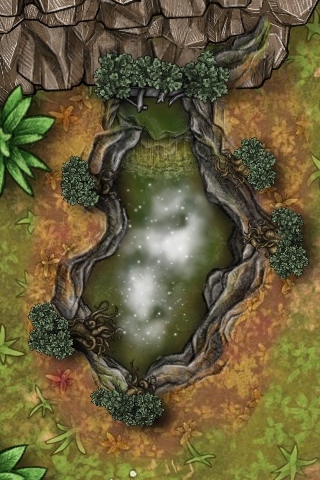
Steam continuously rolls of the pool. the water is choked with scum and algae. The edges are discoloured and rotten. A stream flows from the cliff. A broken gate is in front of the outlet.
This is the runoff from area 2.3 Drain. The party can successfully navigate the drain with a DC 15 Survival check.
If the party investigate the pool, they must pass a DC 15 perception check to spot the gelatinous orbs.
CR 6 – 4 orbs, 2,400XP
CR 7 – 5 orbs, 3,000 XP
1.2 The tents
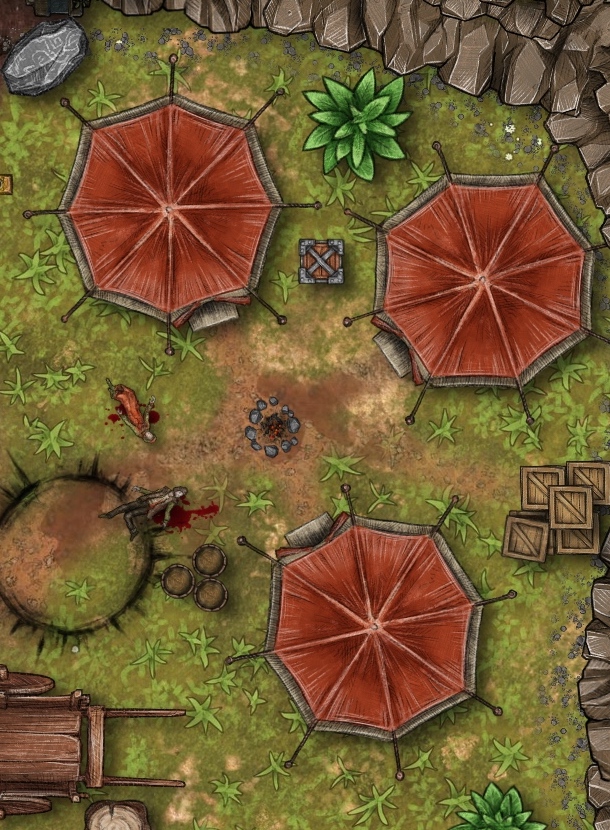
There’s not much of value in the tents – some spare clothes and equipment belonging to the bandits.
1.3 The bodies
One of the bandits is barely clinging on to life. The party can stabilise them enough for some quick questions but he’s too far gone to save (healing potions/spells will barely prolong his life). The party can ask him a few questions before he passes away.
What the party can learn:
- 5 or 6 attackers – large armoured humanoids – too big to be human but too small to be ogres
- Relentless and brutal – killed everyone that went against them
- Armed with great clubs, mauls and obsidian swords
- Weapons seemed to bounce off them
- Likely after the boss’ “special project” (will die after revealing this)
2 The Mine
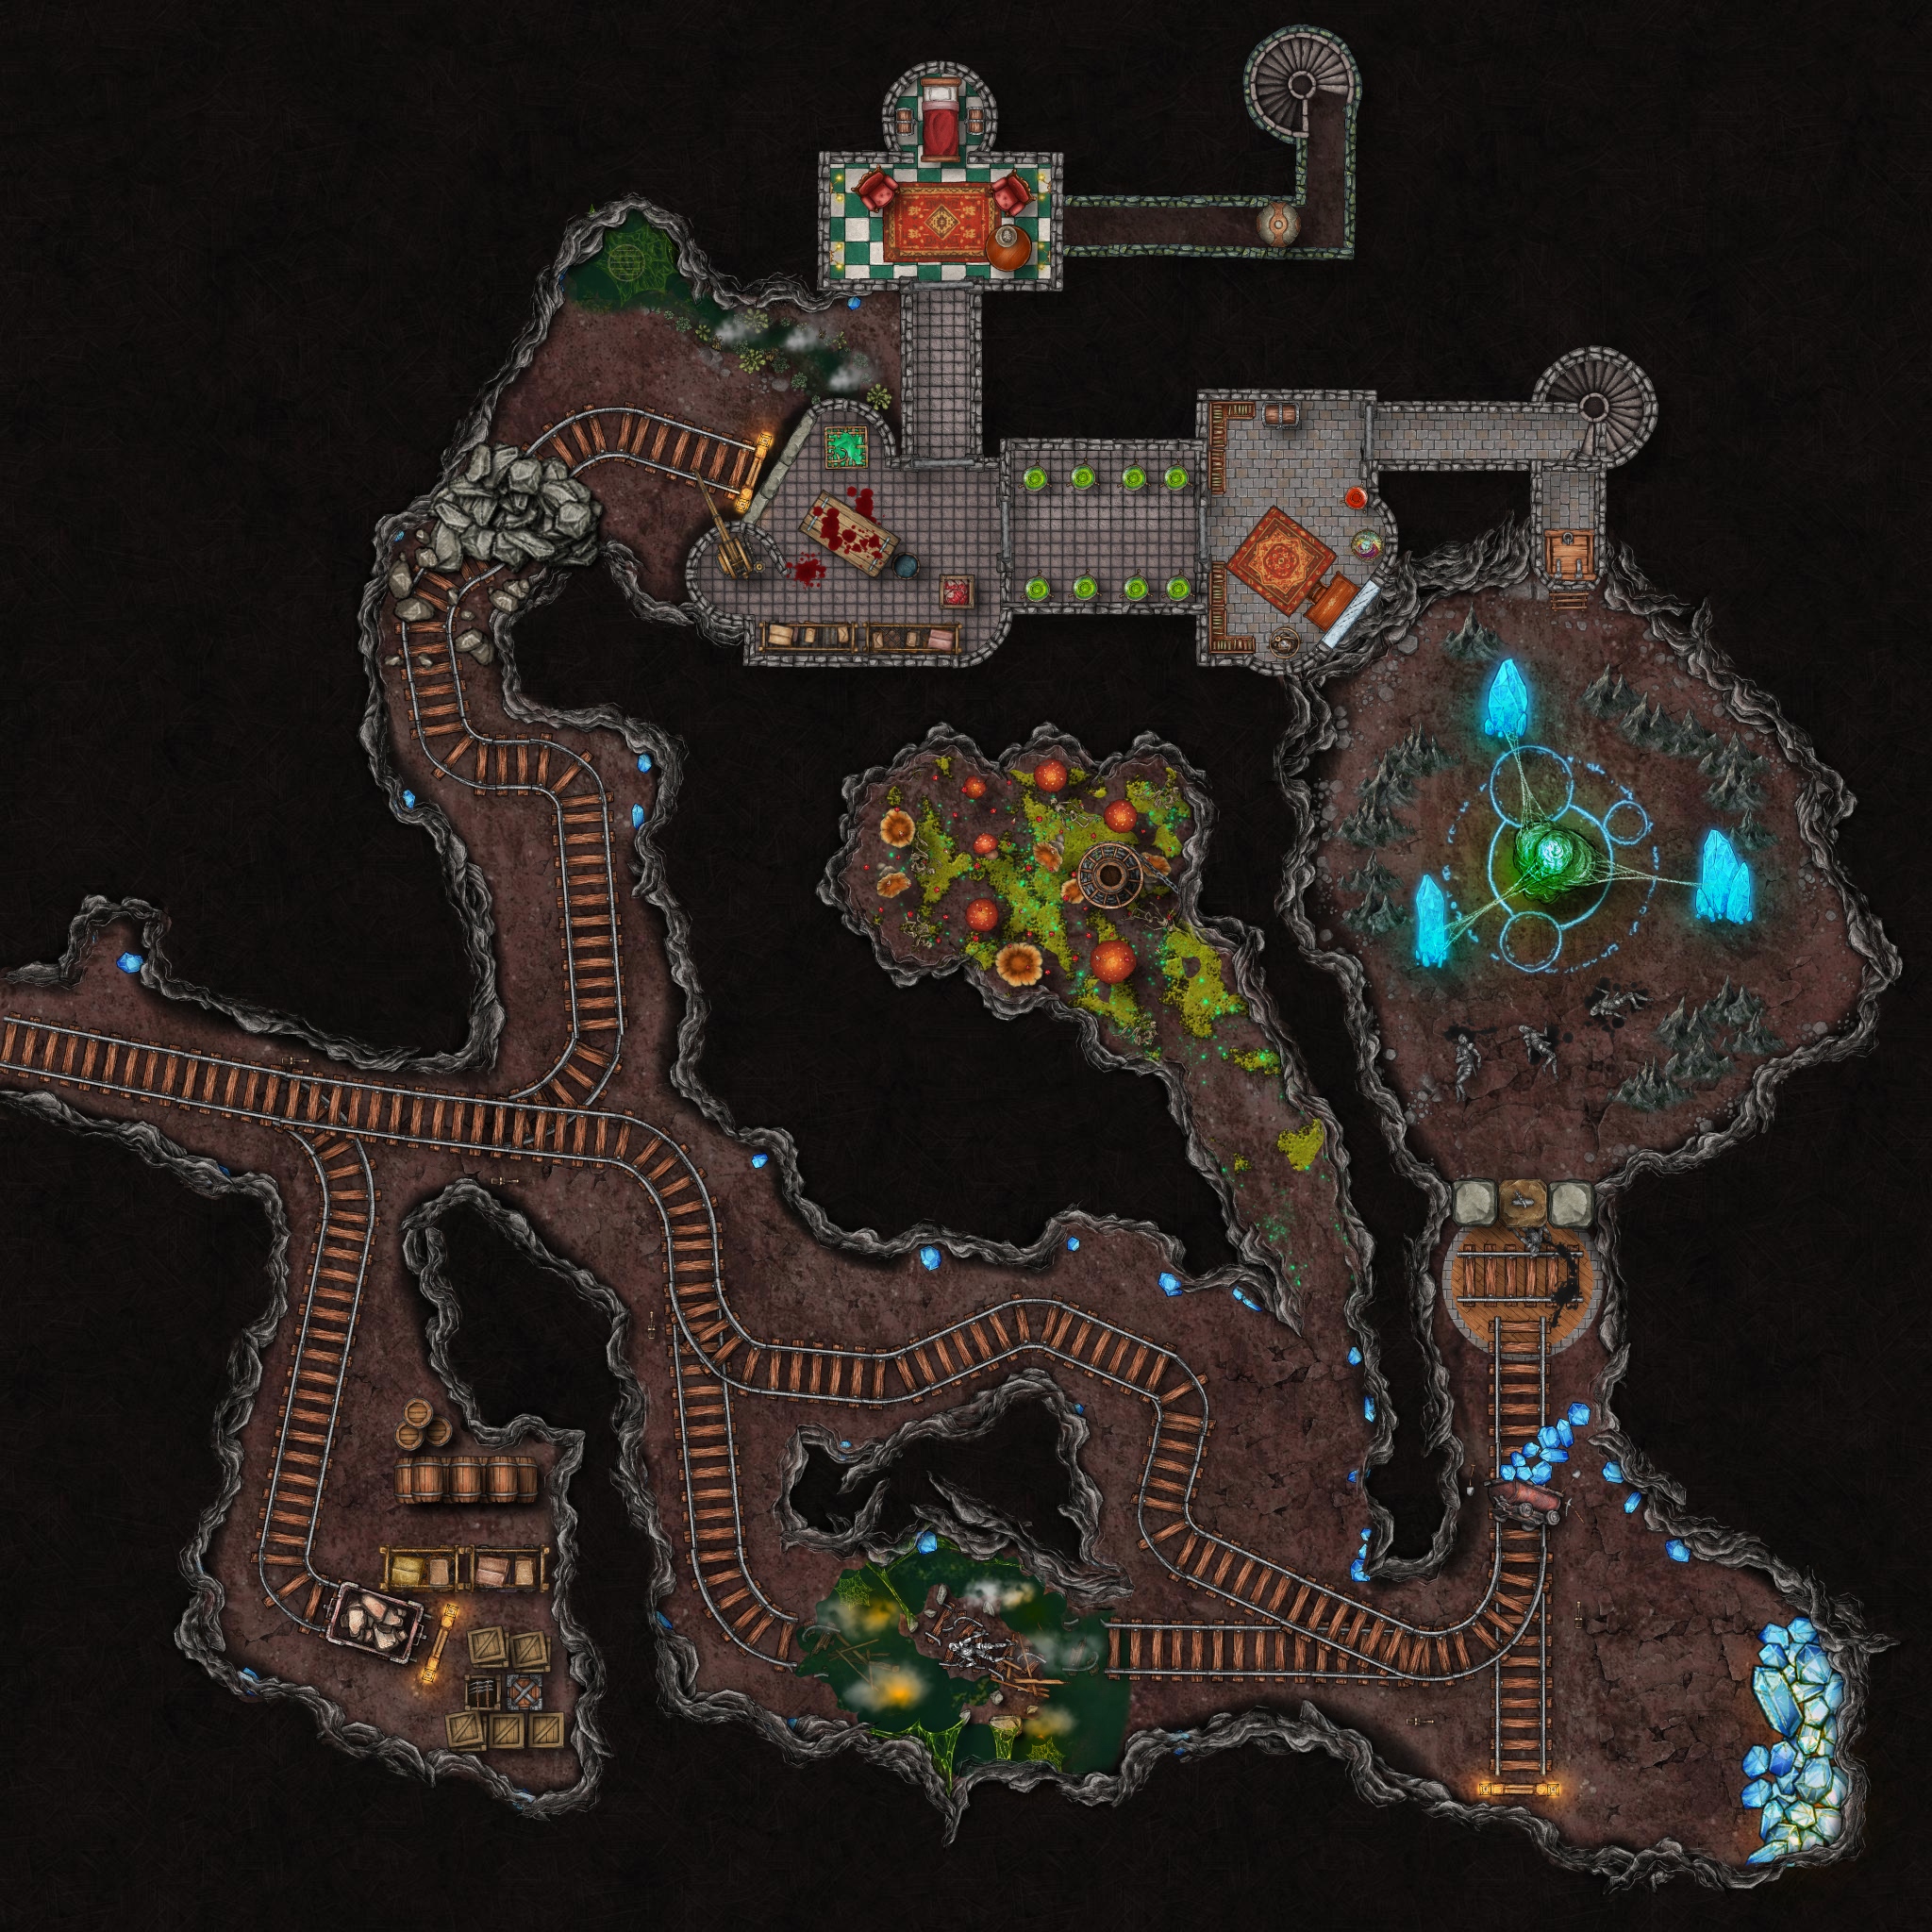
The tunnels are between 10 and 15 ft wide and high. There are crystals in the walls that glow faintly meaning the complex is dimly lit so the party doesn’t necessarily need their own light sources (see Vision and Light). The mine track looks well maintained.
2.1 Store room
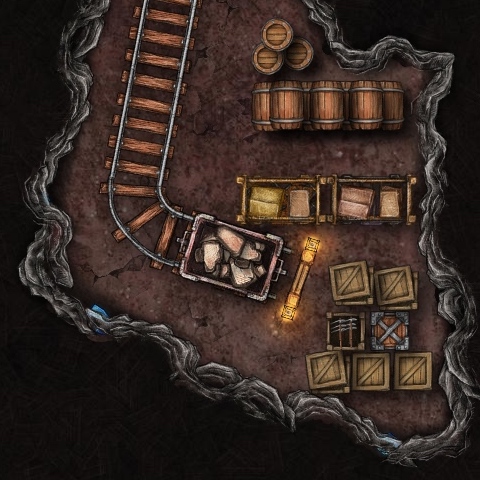
This area is stocked high with miscellaneous goods – all obviously taken from the raided trade caravans.
If a party member makes a DC 20 perception check they notice that there are unusually few metallic objects in the store room.
2.2 Cave-in
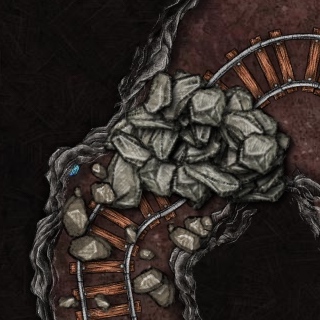
The tunnel suddenly ends in a cave-in, covering the rail tracks and completely blocking the way forward.
A successful DC 13 Knowledge (Dungeoneering) or Knowledge: (Engineering) check will tell the players that this cave-in was deliberate and that it would take hours to clear.
If the party tries to clear the rubble, the Damaged Clockwork Solider from 2.4 Collapsed Bridge will attack them from behind.
2.3 Drain
A cave-in blocks the entrance to the small cave. Tracks run from other the rubble and end at a wall. At the top of the wall, a platform and crane are visible. A waste pipe dribbles slime and water into a small stream that flows from under the cliff and into a small pool.
The drain connects to the outlet that feeds 1.1 Pool.
If the party didn’t encounter the the Gelatinous Orbs at 1.1 Pool, they are lurking in the stream, waiting to pounce.
If the party didn’t encounter the Clockwork Soldiers in 2.10 The Lab, they are here ransacking the room. They are armed with +1 Obsidian Halberds but are otherwise normal Clockwork Soldiers.
2.4 Collapsed Bridge
The ruins of a bridge are clearly evident in the water it once spanned. An armoured body lies sprawled on an island in the middle of the pool.
It takes a DC 17 Acrobatics check to jump across the water and land on the island.
A badly battered armoured figure lies facedown on the ground. Oil rather than blood leaks from the cracks in the armour. One of the arms has been torn off and shards of obsidian from a broken halberd surround the other.
A successful DC 17 perception check and the players will see that the solider is still active. It is at ~50% health and will use the element of surprise to try and get the drop on the player examining them. They only have a single punch attack.
CR 5, 50% health, 1,800Xp
CR 6, 75% health, 2,400XP
The soldier is wearing a Gauntlet of Rust.
If the players search for the missing arm, it is at the bottom of the pool and can be retrieved with a DC 13 Swim check but there’s only the one gauntlet .
2.5 The Fungus Cave
As you enter the tunnel, there is a faint sparkle in the air. The further you go down the heavier the air gets with spores. Five huge mushrooms loom over a windlass. A chain runs from the windlass into the cavern wall.
A trio of Violet Fungus and pair of Shriekers guard the windlass and will attack anyone who approach.
CR 7, 3,200XP
On examining with windlass, the party finds it damaged. If they can repair it, winding it lifts the stone gate in 2.6 The Stone Gate and rotates the turntable. They can repair with a DC 15 Disable Device check. Using supplies from 2.1 Store Room gives a +2 bonus to the repair efforts.
Using area effect spells used to kill the fungus would further damage the mechanism making it more difficult to repair.
2.6 The Stone Gate

The rail ends in a large turntable with the rail rotated 90 degrees. A large stone blocks the way forward. A chain runs from the top of the stone into the ceiling. Crushed beneath the door is another armoured figure. Oil is smeared across the turntable – it obviously rotated after the clockwork solider was trapped.
The windlass in 2.5 The Fungus Cave will lift the door and rotate the turntable.
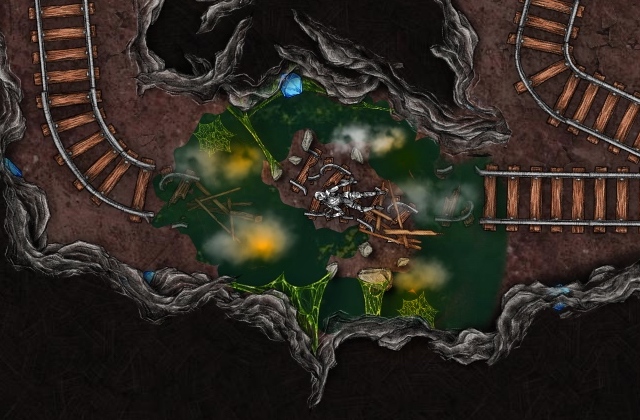
2.7 The Hatchery
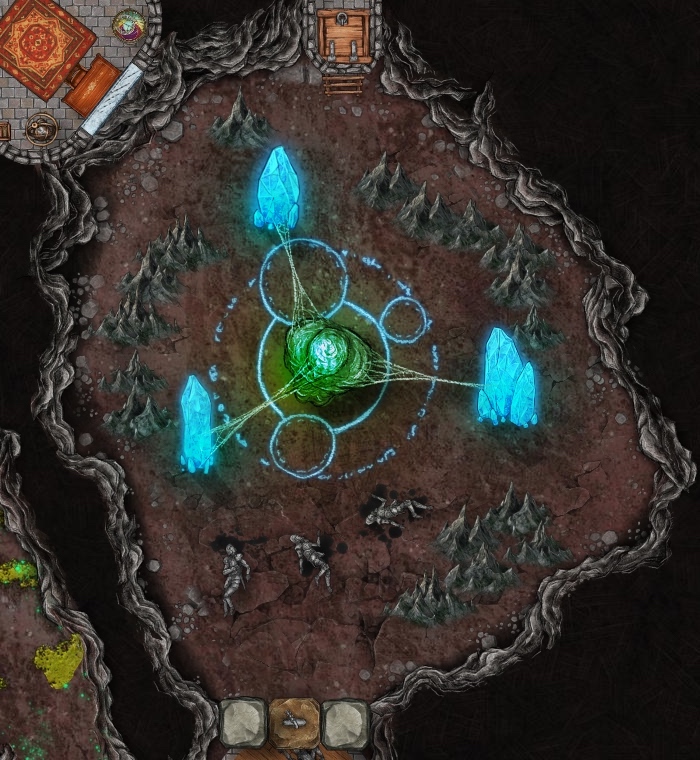
The cavern is lit by three crystal pillars that rise out of the floor. Suspended between them is a giant, metallic chrysalis. You can see something squirming in it and small tears are visible in the shell.
Around the pillars are drifts of metallic looking powder with partially rusted items scattered on top. As the pillars pulse, the remaining items visibly decay.
What appear to be shadows dancing in the interior of the pillars resolve themselves into large, lobster like creatures with long feathery antenna and a clubbed tail. They’re obviously in agony and look like they are screaming in pain every time the pillars pulse.
On the far side of the cavern there is a wooden ladder leading up to an overhang.
The cavern ceiling is between 50 and 60ft high and covered in stalactites. The cavern floor is clear between the entrance and around the pillars. Moving through the stalagmites counts as difficult terrain.
The pillars pulse every 30 seconds (5 rounds). If a player is within 5ft of an intact pillar when it pulses, each metallic item they are wearing/wielding (be reasonable here – don’t roll on each coin!) they must make a save as per the Rust ability of a Rust Monster:
Rust (Su)
A rust monster‘s antennae are a primary touch attack that causes any metal object they touch to swiftly rust and corrode. The object touched takes half its maximum hp in damage and gains the broken condition—a second hit destroys the item. A rust monster never provokes attacks of opportunity by attempting to strike a weapon with its antennae. Against creatures made of metal, a rust monster‘s antennae deal 3d6+5 points of damage. An attended object, any magic object, or a metal creature can attempt a DC 15 Reflex save to negate this effect. The save DC is Constitution-based.
The Hatchery is protected by a Cloaker and a trio of Darkmantles. The Cloaker has cultivated a colony of Piercers (12 CR 1/4, 3 CR1 and 1 CR2) that lurk in the ceiling.
Trapped in the crystal pillars are Rust Monsters which will be released when the chrysalis cracks open. The chrysalis contains a fourth Rust Monster that is being force grown into a Rust Dragon. However, this transformation has been a failure and the creature that emerges will die rapidly in a short, agonising frenzy. The party will arrive just before the creature will attempt to break free. Any interference with the chrysalis will only speed this process up.
If the party investigate the three armoured bodies, they will see that their armour is severely dented with large holes that wouldn’t be normal weapons damage. While they are lingering over the bodies, the Piecers start to gather to drop. If the party is suspicious, a DC 20 Perception or DC 16 Dungeoneering check will let them spot the Piecers before they drop.
After the Piecers have dropped, the Cloaker and Darkmantles will take advantage of the confusion and attack. The Darkmantles will cast darkness on themselves and try and keep the Cloaker in the intersection of the radius so it is in complete darkness and as a secondary priority try to keep the party in darkness.
As the party finishes fighting the Cloaker and his cronies, the chrysalis reaches maturation.
The chrysalis splits open as the creature contained within struggles to free itself. It is badly deformed – it is like a cross between a dragon and insect with large feathered feelers sprouting from the head. Tumours run up and down its body and some organs have grown on the outside. It lets out a roar before collapsing onto the ground and pulling the pillars down with it. With its final pained breath, it spews a torrent of vile reddish-brown liquid.
Any players in a 30ft cone need to make a DC 15 Reflex save. If the fail, they then need to save for their worn/wielded items as if hit by the Rust attack described above.
The broken pillars will no longer pulse when broken, but the Rust Monsters contained within are released and will attack the nearest creatures in a fit of pain-driven rage.
There are three +1 Obsidian Halberds lying beside the remains of the Clockwork Soldiers.
The ladder on the far side of the cavern leads to a trapdoor barred with Arcane Lock.
Overall this is a CR 10 encounter but is mitigated by the fact that there are three distinct phases. The party should barely be able to get their breath back between them and pressure should be maintained through out.
- Piecers: CR 7, 3,000 XP
- Cloaker and Darkmantles: CR 6, 2,800 XP
- Rust Monsters: CR 6, 2,400 XP
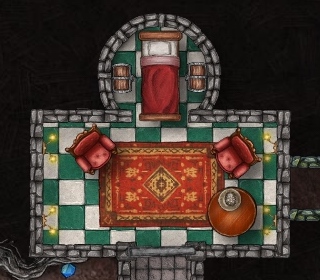
2.8 The Observatory
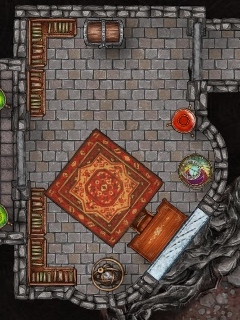
A large desk sits in front of a crystal window overlooking a cavern It is flanked by an orrery and a complex alchemical device. The walls are lined with bookshelves and a single large chest sits against the north wall.
The chest, orrery and alchemical device are in fact mimics and will attack if they or the desk are searched. The mimics can be detected with a successful DC 30 perception check.
CR 7, 3,600XP
Searching the room turn up documents on the life cycles of Rust Monsters, theories on hybridisation of creature through magic, giantism and fast growth through the use of crystals.
2.9 The Fluid Tanks
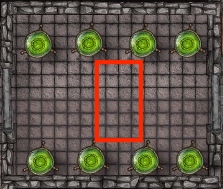
Large glass tanks line the walls of this wide corridor. They are filled to the brim with a green viscous liquid. The north tanks are filled with dissected remains while the southern tanks have various sized brains bobbing in them.
A pressure pad (marked by the red square) will trigger a trap. A DC 20 perception check will discover the trap and it can be disarmed with a DC 25 Disable Device. If the trap is triggered the doors at either end of the room swing shut and lock. The tanks start draining and the fluids spill into the room. Each round a player is in the room, they must make a DC (13 + number of rounds in the room) Fortitude save or they are overcome by the fumes from the chemicals. If they fail, they are overcome as if affected by a Sleep spell.
The doors take a DC 30 Strength check to break open.
2.10 The Lab
Beneath the broken grate is a Gelatinous Cube that was used to dispose of waste. The Gelatinous Orbs have budded off from this and escaped via the drain. It’s well fed and happy to stay in there.
If the party didn’t encounter the Clockwork Soldiers in 2.3 Drain, they are here ransacking the room. They are armed with +1 Obsidian Halberds but are otherwise normal Clockwork Soldiers. If the party tripped the trap in 2.9 The Fluid Tanks, the Soldiers are prepared to engage the party.
CR 8, 4,800XP
2.11 The Apartment
This set of rooms is a well appointed apartment
A man dressed in wizard robes is slumped in one of the chairs slowly eating what appears to be a brain. He looks up and a vexed look crosses his face. “What now? Is there no end to this nonsense?” He stands up and there are wounds visible that should have someone struggling to stay alive, never mind stand.
The man is in fact possessed by the Intellect Devourer who was running the experiments in creating the Rust Dragon.
Once the host body takes 20 points of damage, the host will drop to its knees and the following happens:
“Well that’s not ideal”. The man drops to his knees. His mouth opens unnaturally wide and a large glistening brain on four spindly legs that end in claws crawls out.
When the Devourer reaches ~20 HP, it will attempt to flee through the secret door and trigger the rolling boulder trap to stop the party from following.
CR 8, 4,800XP
On searching the apartment, the following treasure is found in the chests:
2.12 Escape Route
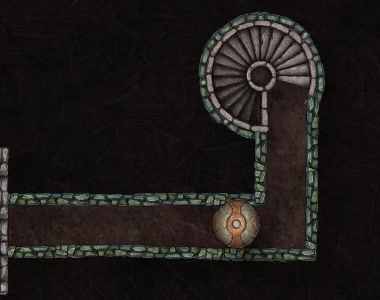
As the Devourer escapes down the tunnel, they flip a lever and a boulder trap is activated. The boulder will block the entrance allowing the Devourer to escape. If the party manages to unblock the corridor, the stairs lead to a concealed exit in the forest above the mine entrance.
Postscript
As the party is leaving the mine, they are buffeted by gust of wind caused by the wings of a Clockwork Dragon landing in the camp. On his back is a ostentatious dressed figure. One of their arms is bare and is obviously mechanical.
“Well I suppose my tin soldiers don’t always work out. You’ve done their job for me so it’d be churlish of me to just kill you now. You will, of course, hand over any research or biological . Any trinkets you found are immaterial – maybe they’ll help you along your way.”
If the party looks like they are going to resist, a host of Clockwork Soldiers reveal themselves from the trees on the cliffs. It should be quickly apparent it would not end well for the party if they do not comply.
Resources
Zip containing maps (has both gird and non-grid versions)